
Adding a RTC to Raspberry Pi | Real Time Clock
The DS3231 RTC Module is a low-cost, low-power and extremely accurate I²C Real Time Clock. A Temperature compensated crystal oscillator and Crystal is integrated into the IC itself. It has battery input to maintain the time even the device is not turned ON for months or even years.
It is available in many packages for different microcontrollers. We will be using the DS3231 RTC Module for Raspberry Pi which has 5 Female Header Pins to easily plug into the Raspberry Pi Pins.
In this tutorial, we will see how to mount, configure and Update the Time and Date on the RTC Module using Raspberry Pi.
Pinout:


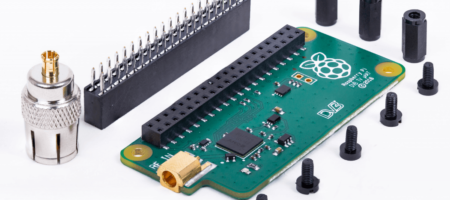
DS3231 Mounted on Raspberry Pi GPIO Pins
We can mount this module directly on the GPIO Pins as shown in the above Image marked by orange Rectangle.
Components Required:
For Headless access to Raspberry Pi, Check these links for SSH into Raspberry Pi using Ethernet, Wi-Fi or USB Over Ethernet methods.
Step 1: Login to your Pi and Open terminal. Update your software by using the following command.
sudo apt-get update
Step 2: Now we need to open Configuration settings and Enable I2C Interface. Run the following command to open the configuration file.
sudo raspi-config
Step 3: Now the configuration window opens. Navigate to ‘Interfacing options’ using your arrow keys.

Step 4: On the next screen, choose the I2C option and hit enter.
Step 5: It will ask for enabling ‘ARM I2C Interface’. Click Ok.

Step 6: Reboot the Pi after these changes using the following command,
sudo reboot
Step 7: After the restart, We need to install two Python Packages called Python SMBus and I2C Tools to check whether the I2C is installed properly.
To install the Python SMBUS and I2C at the same time use the following command.
sudo apt-get install python-smbus i2c-tools
Step 8: Now we can check the RTC is detected properly or not. Use the following command,
sudo i2cdetect -y 1
Modify Raspberry Pi Boot Configuration file for RTC Modules.
We have successfully mounted RTC and it is detected correctly. Now we need to modify the Raspberry Pi /boot/config.txt file to use the RTC Module with Pi.
Step 1: Navigate to the boot directory from the home directory by using the following command
cd /boot
Once we are in the boot directory use the following command to open config.txt file using nano text editor.
sudo nano config.txt

Step 2: After the file is opened, add the following line to any line of the file according to your RTC Module. I have added this for DS3231 in the communication interface lines for easy understanding.
For DS3231 RTC Modules add this line,
dtoverlay=i2c-rtc,ds3231
For PCF8523 Modules add this line,
dtoverlay=i2c-rtc,pcf8523
For DS1307 Modules add this line,
dtoverlay=i2c-rtc,ds1307
Note: Make sure to use the pins properly while connecting to Raspberry Pi GPIOs. Because the pins will vary on different RTC Modules.

Once the changes are made, Press ‘Ctrl X’ and then ‘Y’ to save the file.
After the configuration changes, reboot the pi for configuration changes takes effect.
sudo reboot
Step 3: Use the following command to check the kernel drivers for the RTC Chip is loaded or not,
sudo i2cdetect -y 1
If it is loaded properly, then you can able to see ‘UU’ instead of ‘68’ on the matrix numbers.

Step 4: Now we need to remove the ‘fake hwclock’ package. This package acts as a placeholder for the real hardware clock when you don’t have one.
Use the following two commands to remove the ‘fake hwclock’ and its scripts as we no longer needed.
sudo apt-get -y remove fake-hwclocksudo update-rc.d -f fake-hwclock remove
Step 5: Now we need to enable the real hardware clock script that is already included in the Raspbian by commenting a few lines of code in the Original RTC Script.
Run the following code to edit the RTC Script.
sudo nano /lib/udev/hwclock-set
Step 6: Place a ‘#’ in front of this lines of code.
if [ -e /run/systemd/system ] ; then

   exit 0

fi

The updated lines should looks like this
#if [ -e /run/systemd/system ] ; then

#   exit 0

#fi
Once the changes are made, Press ‘Ctrl X’ and then ‘Y’ to save the file.
Syncing time from the Pi to the RTC Module:
Even after the configuration finished the time in RTC might have been wrong as it is made in other countries. So we need to sync our current time with the Internet and then write it to the RTC Module. Once it is written then you don’t need to sync again. The RTC will hold the time for a Long time.
Step 1: Go to Raspberry Pi Start Icon>Preferences>Raspberry Pi Configuration.

Step 2: Now navigate to Localization tab in the Configuration menu.

In this setting, choose your current Locale and Timezone and Wi-Fi Country for the Raspberry Pi to update your time from the Internet automatically. Once the time is correct we can write this to the RTC Module.

Step 3: Now we try to read the time from RTC Directly to check whether the time is correct or not using the following command,
sudo hwclock -D -r
Step 4: Now we will run this command to check the current time is correct on Raspberry Pi. If the time is not correct of your correct time, makes sure the Internet is connected properly. If the time is correct, we can go ahead and write it on the RTC.
date
Step 5: Use the following command to write the existing (Correct time on Pi) to the RTC.
sudo hwclock -w
Step 6: Now if you read the Time from RTC, You can see the time in Raspberry Pi is synced with RTC. This time will be always in the RTC Module even the Pi is turned OFF for a long time.
sudo hwclock -r

Now you can use this in your time-based projects with ease.


Leave a Reply
You must be logged in to post a comment.