Raspberry Pi Zero W Headless setup – Windows 10 RNDIS Driver issue resolved
Setting up a headless setup for Pi Zero W is simple. The limitation of Pi Zero and Zero W is that it doesn’t have an Ethernet port. All we have is a single USB port. We need to use it as an Ethernet via USB technique to access the Pi. There are many tutorials available for this. But if you are using Windows 10 you might be faced the problem with RNDIS driver. The RNDIS driver will install automatically on all operating systems but not in Windows 10. In Windows10 the Pi Zero W detects as a Serial USB Device instead of RNDIS Device. RNDIS is an Ethernet via USB driver which enables virtual Ethernet connection link between the Pi and your Laptop. I tried downloading the drivers and installed but most drivers didn’t work. Then finally I found a driver link in a forum and I tried installing it manually and it’s worked. So I’m going to explain the complete steps for this headless setup along with driver installation. If you are facing issue only at the driver installation part you can directly continue with step 9.
Hardware Required:
Software Required for Headless setup:
- SD Card Formatter Software
- Win32 Disk Imager Software
- VNC Viewer
- Putty Software
- Sublime Text or Notepad++
- Raspbian OS (Raspbian Stretch)
- RNDIS Driver from MOD (Musical Operating Devices). They are using this driver on their musical devices and it works with Raspberry Pi also. Click here to download the driver. Also, check this forum for more details.
Optional Software:
- Advanced IP Scanner – To find your Pi’s IP. How to use it? Click Here.
The Pi Zero W has in-built Wi-Fi, so you can use the headless Wi-Fi Setup too. Check out the Headless Wi-Fi setup tutorial here.
Step 1: Format the SD card with SD card formatter.
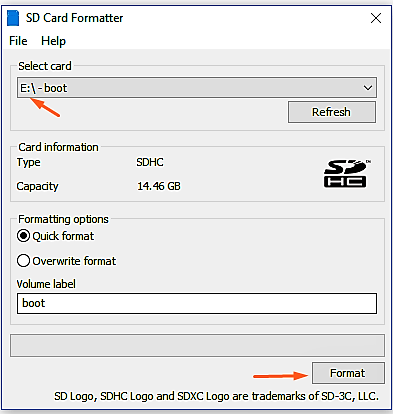
Step 2: After formatting open Win32 Disk Imager (or Etcher), locate the downloaded Raspbian image file and flash it to the SD Card.

Note: NOOBs will not work with this set up (NOOBs is Just an OS installer). So, we need Raspbian. The Current version is Raspbian Stretch. A Raspbian OS is an image file with the ‘.img’ extension (It also comes with ‘.zip’ file you have to extract it before flashing).
Step 3: Once flashing done. Navigate to the SD Card folder. You can able to see the files extracted from the image.

Step 4: Now open ‘cmdline.txt’ file and add this at the end of the file. (Make sure it is at the end of the file not in newline).
modules-load=dwc2,g_ether

Step 5: Now we need to modify the ‘config.txt’ file. So open the ‘config.txt’ file in text editor. Then add the following line anywhere in the file (will be in a newline).
dtoverlay=dwc2

Now save this file and close it.
Step 6: SSH is disabled default in new Raspbian OS. You can enable it by simply create an empty file and name it as ssh without any extension. Make sure the file name extensions option is selected in windows view settings.


Step 7: Eject the microSD card from the computer and place it in the Raspberry Pi. Then connect the PC and Raspberry Pi via USB cable. You don’t need external power as the Pi zero W USB pin provides power as well as data transfer. Wait until the pi boots up completely. It might take up to 90 Seconds.
Step 8: If the RNDIS driver installs automatically then jump to Step 10 for SSH using Putty. If it installs as a USB Serial Device then continue the following steps. You can check this in Device Manager. In Windows 10 the RNDIS Driver installs as a USB Serial Device at COM Port. So we need to install drivers to manually enable Ethernet over USB.
Click here to download the RNDIS Driver which I got from this forum. Extract the downloaded zip files.
Step 9: Open Device Manager and you can see the Pi is detected as USB Serial Device at COM port under the PORTS & LPT. Right click on it and select “Update Driver Software”.

Select ‘Browse my computer for driver software’.

Choose the location where you extracted the driver files on your PC.

Select the Extracted driver folder which is mod-duo-rndis. Click ok and click Next. This will install the driver.
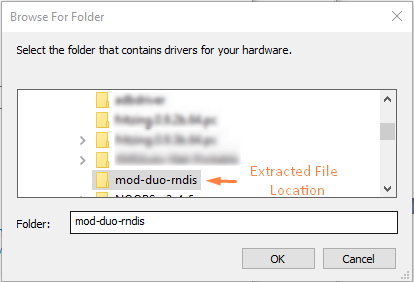

Now you can able to see the Pi Zero W as RNDIS in Network adapters.

Step 10: Make sure you have installed Bonjour Service (Apple Inc.) on your PC. It is a service to discover the Shared resources on the network and web servers. If you have iTunes installed on your PC, then it had been already installed. If Bonjour is not installed then the Hostname will not be mapped with IP. So you are not able to use Hostname (eg: raspberripi.local) in Putty (You can use direct IP of Pi. But finding the IP will be complex for headless setup).
Open Putty and enter the Host Name as ‘raspberrypi.local’ and port as 22. Click open, this will open a terminal window asking for username and password.
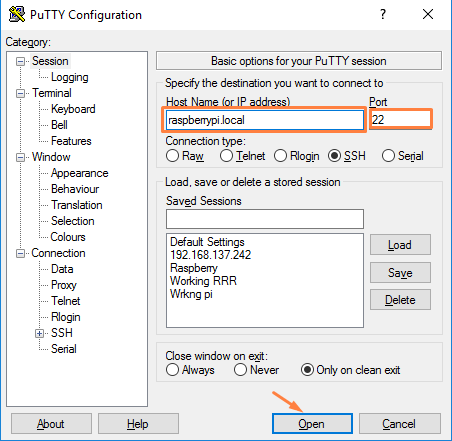
Step 11: Enter the default username as ‘pi’ and default password as ‘raspberry’.

Step 12: Now type vncserver in the terminal window. This will run the virtual server on the raspberry pi.

Step 13: Now go to Google Chrome and open VNC Viewer App (You need to install from google apps store or visit website).
Step 14: Enter the Hostname as ‘raspberrypi.local:1’(Hostname or IP address of Pi with :1 at the end.)

Step 15: Now enter the Pi username and password. The default username is ‘pi’. The default password is ‘raspberry’.

Step 16: Congrats! You can access the raspberry pi with your laptop screen and keyboard now.

Other Headless Setup tutorials:
How to Connect Raspberry Pi with Laptop – Headless Setup Ethernet
Connect Raspberry Pi with Mobile Screen | Android | VNC Viewer
Share this post
Leave a Reply
You must be logged in to post a comment.








Comments (22)
A couple of points
You seem to have missed off installing Bonjour for Windows. Unless you do that, its unlikely that your Windows PC will know what IP address maps to raspberrypi.local
Also, I’d personally recommend using sudo rasp-config to enable vnc server and rebooting the Pi rather than running vncserver manually as you’ll only have to do that once
PS Much better to point to an official source of drivers than copy and host them yourself. People will feel safer that way
Thanks for informing Simon,
I have updated about Bonjour service. And regarding the drivers, it is hosted on that MOD website only (They are using this driver for their musical devices). I have just added the direct download link.
Thank you for your solution
After searching old forum and website about Raspberry Pi Zero W ( USB Device (COM3 – COM4 or COM5) then I found your website.
Treid and verified : It is working with the last raspbian stretch version 2018-03
Thanks again
Great! Help someone in need who was searching for it.
Thank you very much! Your driver helped and was exactly what I was searching for.
Nice! You are welcome.
Day three after formatting a working zero so i could record a fail-safe way of reaching a headless state.
I know when I first tried it that I couldn’t get it to work, there is only so many times you can check your ssh file or wpa.conf. I ended up plugging in a Usb cable and assigning it an IP address.(if only I could remember how)
Yesterday i watched over 30 YouTube tutorials “Pi zero headless” and none worked for me, no matter how many versions of raspian, how many versions of image writers, how many versions file editors.
Today I found your post, yours is different than all the tutorials i did yesterday in the cmd.txt file, all the others had modules-load=dwc2,g_ether after “rootwait” and not at the end. Could this be my problem?
Bonjour is in, RNDIS driver is in, the pi shows up as unidentified network and is unreachable with putty or Advanced IP Scanner. netstat -n netstat -a netstat -b don’t show it but it can’t be far away. ;-)
It doesn’t matter before or after rootwait. But one thing you need to care about is the space (Also Enter key or \n characters). Because, the program gets parsed one by one (each text is get parsed). So the enter (newline \n) will be parsed incorrect and won’t add the next text. So you need to be care ful on the space and newline. That’s y in the image I mentioned everything in single line (sublime text shows the line number. See the image).
One more error will be the empty SSH File (It will get deleted every time you boot. It can be enabled permanently after you access the pi in pi config settings).
If you want to backup your working Pi SD Card (Backup existing os settings) Check this tutorial – https://www.factoryforward.com/clone-raspberry-pi-sd-card/
For some unfathomable reason I could not get ssh to work independently, this was an extremely simpler solution.
Awesome!
Cheers! ;)
The driver fixed the problems I had. Awesome. Many thanks!
You are always welcome Wesley :) Thumbs Up!
Very useful! In particular step 8 and 9 provided me the solution I was looking for (I’m using windows 10). I searched a long time on the net before finding this.
Thanks again.
very interesting points you have remarked, appreciate it for putting up.
keeps saying connection timed out but it showing up on my devices. Its connected and stuff just cant ssh into can someone help me please? I put a new image on it
my email is [email protected]
Check whether the Bonjour service is installed on your PC or not. If not you can’t use the ‘raspberrypi.local’ method.
Alternatively, You need to find exact ip and use it.
Quote: “You can use direct IP of Pi. But finding the IP will be complex for headless setup” :EndQuote
There a a tutorial on youtube how to get the exact IP address of the RPi
https://www.youtube.com/watch?v=PWMVowAK6wg
In the command prompt, one has to type the command
arp -a
which lists the IP addresses in use.
All one has to do is look for an IP address which is marked as ‘dynamic’ which is the IP address of the RPi.
By doing so, Bonjour will not be required.
Hi, i’m just here to say thanks, i had a lot of problems with the connection using the local domain and your tutorial worked like a charm, is the only one that works for Windows 10, at least for me, thank you!!
You are welcome :)
Thanks a lot Sharath! I had exactly the same problem with raspbian buster, and now it works perfectly
It worked !!! That make me crazy during a while and its finnaly ok !! Thank a lot you’re a genius !!
Great tutorial, thanks !